Palette Maps
Currently, we utilize palette maps for our collars. Maps allow us to create many color variations of a sprite without having to create a separate sprite set for each color.
Navigating the Files
Within the sprites folder, you'll find the acc_collars.png spritesheet and the palettes folder.
acc_collars.png holds all the collar sprite mapping while palettes holds the files for each style's palette map.
Tip
Throughout this doc we'll refer to style and style_type. Collars are broken down into style_type such as BOW, LEATHER, and NYLON. Each row of the acc_collars.png file is a new style_type. Each sprite within a row is a style within that style_type.
palette files are named as such: acc_collars{STYLE_TYPE}_palette. Some style_type will include multiple descriptors separated by _, such as: LEATHER_BELL_GRADIENT. Every style_type should begin with it's style (i.e. LEATHER is the style of LEATHER_BELL_GRADIENT.)
We also utilize the collar_sprite_data.json file in sprites/dicts. This holds our style_data, essentially an array of our style, style_type and color palettes. This is where all sprite name information is pulled from.
Utilizing the Spritesheets and Palettes
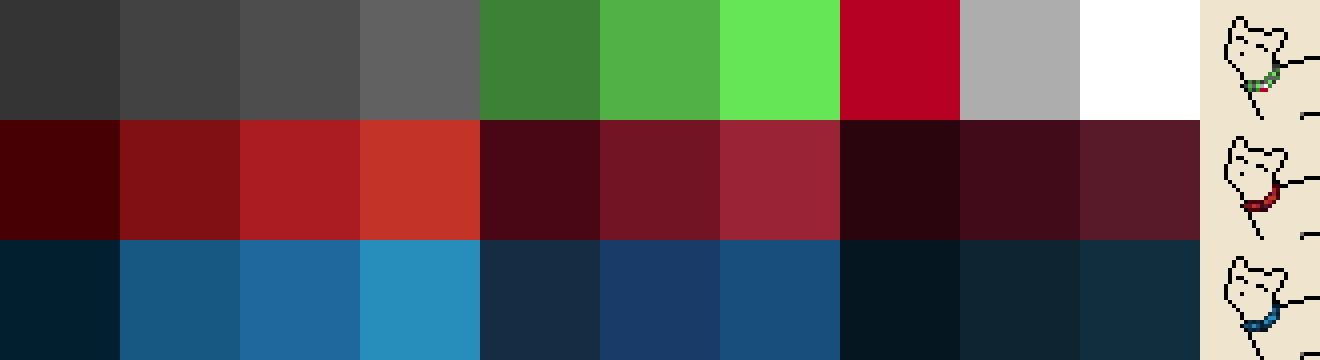
Upon viewing the spritesheet, you'll notice that the sprites are mostly greyscale, with some pops of color. The colors used here will not be seen in-game, rather they are a "map" used to tell the code where our palette colors should go.
This means that colors used in our spritesheet could be anything, but should be selected with a human gaze in mind. While the code can tell the miniscule differences between 5 different dark grays, we will have significantly more trouble.
These sprites should generally be a clearly defined grayscale with important features highlighted in bright color. For example, the LEATHER collars are grayscale with red defining the edges of the buckle. This makes it easy for a human viewer to understand that this is an important feature and much easier to identify which palette color is associated with it.
Important
An exception here is our standard black outline for parts of the accessory that go outside the cat sprite lines. This outline should still be pure black on the spritesheet.
Each palette png can be viewed as rows. The top row is our "base" color palette, aka the color palette already utilized in our spritesheet. Each following row is a new color palette with the color in each column being associated with the top "base" color. This is how we tell the code which color goes where.
Adding a New Color
If you would like to add a new color palette to a style_type, it's as simple as opening the associated palette png and adding a new row at the bottom of the png.
Then, head to the collar_sprite_data.json and add the name of your new color palette to the end of that style_type list.
The accessory should now be accessible in game with the new color palette!
Adding a New Style
If you would like to add a new style to a style_type, you'll have to do some work within the spritesheet. Remember, each row is a different style, so you'll be adding your new style_type to the end of it's intended style row. It's alright to extend the width of the spritesheet file if you need to.
Then, create the sprite set for your new style_type. Remember, the colors used here are just a map for the code to follow; they won't be seen in game. Make sure it's easy to see the important features of your style_type.
Once you're finished with the spritesheet, you'll have to make a new palette file for the style_type. This should be named following our file naming convention discussed at the start of this doc.
The top row of this png will be the colors you used on the spritesheet. The black outline doesn't need to be included here, but all the other colors you used do! Try to arrange them in an intuitive fashion so that it will be easier for future editors to understand how the palette translates to the sprite. Following color palettes are added exactly as already discussed.
To add the new style to the acc_collars_sprite_data.json, you'll add a new list to the end of the associated style_type dict. Note that the order of these lists has to match the row order of the sprites in the spritesheet.
You'll also need to do some additional work to ensure the style name displays correctly on cat profiles! Head to the resources/lang/en/cat/accessories.en.json file. At the end of this file you'll add a new dict for your style formatted like this example:
        "NYLON_BELL_GRADIENT": {
            "zero": "colorful belled nylon collar",
            "many": "colorful belled nylon collars",
            "one": "colorful belled nylon collar"
        }
"zero" is the profile display name while "many" and "one" are the plural and singular forms used when referencing this accessory in event text.
Adding a New style_type
If you would like to add a new style_type entirely, you'll need to add a new row to the bottom of the spritesheet. Then, create whatever style sprites you desire in that row!
Once you've edited the spritesheet and added the palette png files, you'll add the new style_type to the collar_sprite_data_json. The new style_type should be added as a new dict at the end of the style_data list.